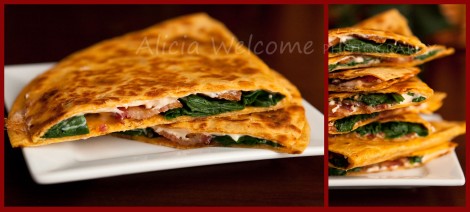
Cheesy Spinach & Bacon Quesadillas


I started with a recipe tonight for these, but altered the already small ingredients list enough times that I think it is no longer the same recipe, so I will just share mine instead.  I was sort of concerned before making these that not only would there not be enough filling for each quesadilla (compared to past quesadillas we’ve made), but that we’d be hungry still after eating them as our dinner tonight.  It’s a fine line some nights to come up with a dish that is low enough in calories for my dietary needs while still being filling, but also high enough and filling for my husband as well who gets a lot more calories a day than me.  Quesadillas are a pretty light meal in general, but just looking at the ingredient amounts I was concerned these would be even more so.  It turns out that I was wrong, and these were more than satisfying.  I actually started to feel pretty satisfied after one to tell you the truth, but I managed to eat that second one somehow lol.

The flavor on these is awesome.  The little bit of heat from the tortillas, matched with the creamy smoked flavor of the cheese, and the sweet smokey bacon and fresh spinach is just perfect.  I think serving these with a bit of sour cream would be even better, but it’s definitely not necessary if you are hoping to keep the calories down.

I want to take just a moment to talk about the bacon…. if you have never cooked your bacon in the oven you don’t know what you’re missing!  Not only is there no splatter of oil to clean up and ruin your clothes or burn you, but each piece is perfectly done with ease, and stays nice and straight and looks amazing!  Thick cut bacon works best, but you can certainly do it with any bacon you have.  You just have to watch it closely because the time in which is crisps happens so quickly.  I am going to go ahead and say every oven is different, and so is every bacon so there is no cut and dry temperature/time combo that will work best, but I will list what I used tonight as a guideline to get you started and you’ll just have to try it for yourself to find out what works best in your oven.

Cheesy Spinach & Bacon Quesadillas

Serves : 2-4                            Time to make : 10 minutes (not including bacon preparation time)

Ingredients :

  • 4 Jalapeno Cheddar Tortillas (they are large and the brand is Mission)
  • 3 oz. nonfat cream cheese
  • 3/4 cup shredded gouda
  • 8 strips of thick cut bacon, crispy
  • 1 cup of fresh baby spinach (or basically a large handful)

Directions :

  1. First make your bacon… either in the skillet if you prefer, or in the oven as mentioned above.  To make it in the oven line a large cookie (with sides) with foil and place a rack on top.  The foil should come up the sides a bit to catch all your grease for easy cleanup.  Spray rack a bit with non-stick cooking spray.  Lay bacon on rack making sure not to overlap them for the best results.  Bake in a 350 degree oven (not preheated) for about 25-30 minutes or until done, paying close attention starting around 15 minutes and flipping them once or twice for even crisping.
  2. Once bacon is done, combine the cream cheese and gouda in a small microwave safe bowl and heat for about a minute until melted stirring about halfway through.  Watch closely so it doesn’t burn or anything, but it should be fine as long as you stirred it.  You’ll end up with a sort of sticky, ball of cheese rather than a truly melted sauce.
  3. Split the cheese among the four tortillas and spread on one half of each.  Next layer on the bacon.
  4. Heat a skillet over medium-high heat, add about a T. of water and throw in the spinach stirring gently.  Cook just until it has wilted down a bit, and then remove it.  Layer that into your quesadillas last before folding them over into half circles.
  5. Wipe out any moisture in your skillet left from the spinach and spray with a bit of non-stick cooking spray.  Heat over medium-high heat and then cook your quesadillas in there either one at a time, or if you are brave and have a large skillet go for two at a time but it will make it harder to flip them.  Again, watch closely because once they start to brown they will burn fast if you aren’t careful.  It will probably only take a minute or so for the first side to brown up and start to get crispy, then flip it and cook the other side.  Note: the other side will brown even faster so pay attention.
  6. Cut in half and serve warm.  Optional to serve with a bit of sour cream as well.
cheesyspinach&baconquesadilla

Ultimate Tuna Melt


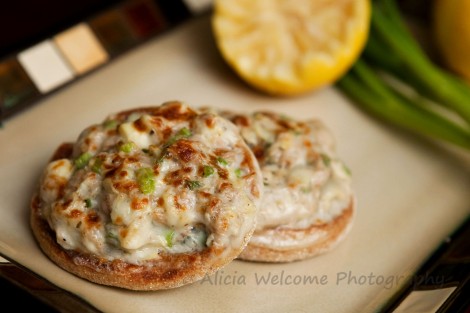
Let me start by saying I did not name this recipe.  It came from Food.com.  However, I do agree that this is one awesome tuna melt!  The first time I made this recipe was in 2007, and I have made it countless times since.  Not only are they tastey, but they are quite quick and simple to prepare, and low in fat and calories.  These melts make it into our meal rotation often during those times we are trying to lose a bit of weight… such as last night lol.

Over the years I have very slightly altered the recipe to suit our needs and this is what I will share on my blog.  The ingredients are all basically the same, but I may have changed a few amounts and also the method a little to give the best results.  Jeff and I usually each eat 4 of these…. yeah I know it sounds like a lot, but even at that many the calorie total fits well within our daily budgets.  If you can find the 100 calorie english muffins that works best (if you are counting calories anyway), but any type will do just fine.  Likewise, I use the ultra thin cheese for diet reasons, but have used regular slices before as well.  As for the tuna, I use chunk light because I try to avoid Albacore for the mercury levels, however the original recipe did suggest the albacore.


Ultimate Tuna Melt

Serves : 2-4               Time to make : 15 minutes

Ingredients :

  • 4 (100 calorie, or wheat variety) english muffins, cut in half
  • 2 small cans of tuna (in water), well drained
  • 3/4 cup artichoke hearts, drained and chopped (I usually use one of the small jars of marinated hearts)
  • 1/2 cup green onions, chopped
  • 2 T. fresh lemon juice
  • zest of a lemon
  • 1 tsp. oregano
  • 1/4 tsp. black pepper
  • 1/8-1/4 tsp. cayenne pepper (start with the lesser and taste it)
  • 2 tsp. olive oil
  • 8 slices ultra thin provolone

Directions :

  1. Preheat broiler, and arrange muffins on baking sheet.  Spray lightly with any sort of cooking spray and brown slightly.  This happens fairly quickly so keep an eye on it.  Once done set aside while you mix the topping.
  2. In a large bowl combine the tuna, artichokes, onions, lemon juice and zest, seasoning, and oil.  Spoon carefully onto each toasted muffin.  Top with a slice of cheese.
  3. Broil for a couple of minutes, watching closely until cheese has melted and starts to brown.  I find that rotating them helps get them all evenly done.

ultimatetunamelt

Day 119 : Spicy Thai Tuna Roll


Instead of going to the store today I decided to use up some of the stuff we already had again.  Like I’ve said before, it really helps me to use things up and waste less if I have to get creative, and that’s just what I did today.  I was pretty surprised at how it turned out, and though I think it is good as-is, I might make minor changes if I were to plan ahead for it.

For example, I would use fresh basil if given the choice, and I might choose a different cheese like monteray jack, or even different lettuce.  The addition of some finely chopped red peppers might be nice too.  For the tuna I buy these things called Tuna Sensations, and they come in various flavors.  I usually get the lemon pepper or sun-dried tomato ones and have used them in various ways in the past.  This was the first time I tried the thai one and by itself I was not impressed and almost didn’t continue to make my lunch, but after I doctored it I really did like it.  One thing I left out though was the spicy thai pepper on top, since I felt it was pretty spicy already without it.  I also took the crackers out and will just use them elsewhere.

I didn’t really measure everything so I will give estimations below.

Spicy Thai Tuna Roll

Serves : 1             Time to make : 5 minutes

Ingredients :

  • 1 can Tuna Sensations Spicy Thai Chili (use crackers elsewhere)
  • 1 1/2- 2 T. mayo (however creamy you like your tuna)
  • basil, I used about 1 tsp dried, but I would use maybe 1/2-1 T. fresh or thai holy basil would be great
  • 1 T. fresh cilantro chopped
  • dry roasted peanuts, chopped (about 1-1 1/2 T.)
  • lettuce (I used spring mix) . enough for a layer on the wrap
  • low fat mozzarella, small handful
  • 1 light Flatout wrap

Directions :

  1. mix together tuna, mayo, basil, and cilantro.
  2. layer lettuce on wrap, then cheese.
  3. place the tuna towards one end about an inch or so in and just make a sort of log shape with it that almost reaches both sides.
  4. Sprinkle peanuts on top of tuna.
  5. Starting at the side with the tuna, roll up tightly and cut in half.

Day 49 : Grilled Cheese with Spinach and Pancetta


Today was my son’s first birthday party and I needed something to make for guests that was a good lunch and not too filling since there was also dip, veggies, and of course cake.  It also needed to be quick and easy!  A couple of days ago I saw Giada make these on her show for some kids at a cake decorating party and thought they would be the perfect thing.  I knew the spinach would throw a lot of kids and even some of the adults off, but I figured that if they just tried it they would probably like it.  I love finding ways to incorporate foods/ingredients you don’t typically like in a way that makes you change your mind.  Personally I don’t have anything against spinach, but I wouldn’t eat it cooked plain.  I like it in salads, on sandwiches and even cooked in pastas though.

The flavor of these sandwiches is pretty simple/mild, but it is meant for kids afterall.  We really did enjoy them, and for me the spinach flavor was not very strong at all.  I really love the beautiful green color though of the oozing cheese!  I used bacon just because the only pancetta I can find in my area comes chopped up and I wanted to bake them as stated rather than pan fry it.  It’s great as is, and a perfect thing to serve at parties because you can get it prepped ahead of time and then just whip out the grilled sandwiches a few at a time, no problem.

I think in the future I want to revisit these though and take them to a whole new level.  I am thinking something along the lines of a triple decker type sandwich with one side the spinach mixture and the other maybe a roasted red pepper one or even artichokes because anybody who has had spinach and artichoke dip knows that they go SO well together.  I would maybe throw in some lemon or garlic as well just to add layers of flavor.  I am actually excited to come back to this one lol.

*BTW, as predicted some of the kids DID indeed enjoy these without knowing what the “green stuff” was!  I recommend not telling them ahead of time and let them make their judgments based on flavor alone.

Grilled Cheese with Spinach and Pancetta

Serves : 8                           Time to make : 20 minutes

Ingredients :

  • Cooking Spray
  • 6 oz. pancetta, cut into 1/8-inch thick slices
  • 1/2 cup unsalted butter, at room temperature
  • 2 cups (8oz) shredded Monteray Jack cheese
  • 2 cups (8oz) shredded mild Cheddar
  • 1 tsp. kosher salt
  • 1 T. vegetable or canola oil, plus extra as needed
  • 2 packed cups coarsely chopped baby spinach
  • 16 slices country-style white bread (I actually used a 9 grain which was really nice)

Directions :

  1. Put an oven rack in the center of the oven. Preheat the oven to 400 degrees F.
  2. Spray 2 baking sheets with cooking spray. Lay the pancetta in a single layer on the prepared baking sheets and bake until crispy and brown, about 12 to 14 minutes. Drain on paper towels. Cool for 5 minutes and crumble. Set aside.
  3. In a food processor, combine the butter, cheeses, salt, and 1 tablespoon vegetable oil. Blend until smooth, adding extra oil, as needed, until the mixture is spreadable. Add the spinach and pulse until just combined.
  4. Preheat a panini maker. Spread the cheese mixture over 8 slices of bread. Top with the crumbled pancetta. Put the remaining bread slices on top. Grill the sandwiches, 2 at a time, until golden and crispy, about 3 to 4 minutes. Cool for 2 minutes, then cut each sandwich in half and arrange on a platter.